Common Problems After Engine Replacement
Replacing an engine can be a complex and costly process, but it is often a necessary step to keep a vehicle running smoothly. However, even after the replacement, there can be common problems that arise. Understanding and addressing these issues promptly can help prevent further damage and ensure the longevity of the new engine.
One common problem that may occur after an engine replacement is overheating. This can be caused by a number of factors, such as a faulty radiator, a malfunctioning thermostat, or a blocked cooling system. It is important to diagnose the exact cause of the overheating and take appropriate action to prevent any damage to the new engine.
Another potential issue is oil leaks. While it is not uncommon for a small amount of oil to leak during the engine replacement process, persistent leaks can be a cause for concern. Common causes of oil leaks include loose or damaged gaskets, faulty seals, or improper installation of components. Identifying and fixing the source of the leak is crucial to prevent any further damage to the engine.
In addition, problems with the electrical system can also arise after an engine replacement. This can manifest as issues with starting the vehicle, dimming lights, or intermittent power loss. These problems can be caused by a variety of factors, including loose connections, damaged wiring, or a faulty alternator. A thorough inspection of the electrical system should be conducted to identify and rectify any issues.
Dealing with these common problems after an engine replacement requires careful attention and prompt action. It is advisable to seek the assistance of a professional mechanic to diagnose and resolve these issues to ensure the optimal performance and longevity of the new engine. Taking proactive steps to address these problems can save time, money, and prevent further damage down the line.
Common Issues Post Engine Replacement
After replacing an engine, there are a few common issues that car owners may encounter. These problems can arise due to various reasons such as improper installation, faulty parts, or issues with the new engine itself. It is important to address these issues promptly to ensure the optimal performance of the vehicle.
One common problem that car owners may face is engine overheating. This can be caused by a malfunctioning cooling system, such as a faulty radiator or thermostat. It is important to thoroughly check the cooling system after an engine replacement to identify and fix any issues that may cause overheating.
Another common issue is oil leaks. Engine replacements may involve disconnecting and reconnecting various components, which can result in leaks if not done properly. It is essential to ensure that all connections are secure and that gaskets and seals are in good condition to prevent oil leaks.
Electrical problems are also common after engine replacements. Wiring harnesses and connectors may have been disturbed during the installation process, leading to issues with the electrical system. It is advisable to check all electrical connections and fuses to ensure they are properly connected and functioning correctly.
Noise and vibration problems can also occur after engine replacement. These issues can be caused by misaligned components, such as the engine mounts or exhaust system. Proper alignment and adjustment of these components are necessary to eliminate any noise or vibrations.
Lastly, poor performance and decreased fuel efficiency can be observed after an engine replacement. This can be due to a variety of factors, including incorrect engine calibration, malfunctioning sensors, or fuel system issues. It is crucial to have the engine’s performance checked by a professional and address any potential issues to restore optimal performance.
In conclusion, it is important to be aware of the common issues that may arise after an engine replacement. By addressing these problems promptly and effectively, car owners can ensure the longevity and performance of their vehicles.
Identifying and Addressing Common Problems
After replacing the engine in your vehicle, it is important to be aware of and address any common problems that may arise. These problems can range from minor issues to more serious complications, and it is crucial to identify and address them promptly to ensure the proper functioning of your new engine.
One common problem that may occur after engine replacement is an oil leak. This can be caused by a variety of factors, such as loose or damaged oil seals, incorrect installation of gaskets, or even a faulty oil filter. To address this issue, it is important to visually inspect the engine for any signs of oil leakage and to check the tightness of the oil seals and gaskets. If a leak is detected, the affected components should be replaced or repaired as necessary.
Another common problem that may arise is engine overheating. This can occur due to a variety of reasons, such as a malfunctioning thermostat, a faulty radiator, or a lack of coolant. To diagnose and address this issue, it is important to check the coolant levels and inspect the thermostat and radiator for any signs of damage or malfunction. If necessary, the thermostat or radiator should be replaced, and the coolant levels should be topped up to the appropriate level.
Additionally, a common problem that may occur after engine replacement is poor performance or misfiring. This can be caused by issues such as faulty spark plugs, incorrect ignition timing, or a malfunctioning fuel injector. To address this issue, it is important to visually inspect the spark plugs for any signs of damage or wear and to ensure that they are properly gapped. The ignition timing should also be checked and adjusted if necessary. If the issue persists, it may be necessary to clean or replace the fuel injectors.
Finally, another common problem that may arise is abnormal engine noise. This can be caused by various factors, such as loose or damaged components, improper engine assembly, or even a faulty accessory drive belt. To address this issue, it is important to visually inspect the engine for any loose or damaged components and to check the tension and condition of the accessory drive belt. If necessary, the affected components should be tightened or replaced to eliminate the abnormal noise.
In conclusion, after engine replacement, it is important to be vigilant for any common problems that may arise. By identifying and addressing these problems promptly, you can ensure the smooth and efficient operation of your new engine.
Ensuring a Smooth Transition After Engine Replacement
Replacing an engine in a vehicle is a complex and costly process that requires careful attention to detail to ensure a smooth transition. While engine replacements can help solve common problems such as engine failure or poor performance, it’s important to take certain steps to ensure that the new engine is properly integrated into the vehicle’s systems.
1. Perform a thorough inspection: Before installing the new engine, thoroughly inspect it for any damage or defects. Check for signs of oil leaks, loose connections, or any other issues that could impact the performance of the engine.
2. Update software and ECU: Many modern vehicles are equipped with electronic control units (ECUs) that need to be updated to accommodate the new engine. Make sure to update the software and ECU to ensure optimal performance and compatibility.
3. Properly align and mount the engine: When installing the new engine, ensure that it is aligned and mounted properly, following the manufacturer’s recommendations. Improper alignment or mounting can lead to excess vibration, premature wear, and even damage to other components of the vehicle.
4. Flush and refill fluids: Before starting the vehicle with the new engine, flush and refill all necessary fluids, including coolant, oil, and transmission fluid. This will help ensure proper lubrication and cooling of the engine, reducing the risk of overheating and damage.
5. Test and monitor performance: After the engine replacement, perform comprehensive testing to ensure that all systems are functioning correctly. Monitor the vehicle’s performance closely for any signs of abnormal behavior or issues that may have arisen during the installation process.
6. Perform regular maintenance: Once the engine replacement is complete, it’s crucial to follow a regular maintenance schedule to keep the new engine in top condition. Regularly check and change the oil, filters, and other components as recommended by the manufacturer.
In conclusion, ensuring a smooth transition after an engine replacement requires attention to detail and following the proper procedures. By performing a thorough inspection, updating software and ECU, aligning and mounting the engine correctly, flushing and refilling fluids, testing performance, and maintaining regular maintenance, you can maximize the lifespan and performance of the new engine.
Monitoring Engine Performance and Functionality
After undergoing an engine replacement, it is crucial to closely monitor the performance and functionality of the new engine to ensure that everything is running smoothly. Proper monitoring can help detect any potential issues early on and prevent further problems down the line.
1. Check for Leaks: Regularly inspect the engine for any signs of leaks, such as oil or coolant. Leaks can indicate problems with the gaskets or seals and should be addressed promptly to prevent damage to the engine.
2. Monitor Fluid Levels: Keep an eye on the levels of various fluids in the engine, including oil, coolant, and transmission fluid. Low levels can indicate leaks or other issues that need attention.
3. Listen for Unusual Noises: Pay attention to any unusual noises coming from the engine, such as knocking or grinding sounds. These noises can be indicators of internal damage or wear and should be investigated further.
4. Observe Exhaust Smoke: Excessive smoke from the exhaust, whether it be white, black, or blue, can be a sign of engine problems. White smoke may indicate coolant or oil burning, black smoke can suggest a fuel system issue, and blue smoke could be a sign of oil consumption.
5. Monitor Engine Performance: Keep track of the engine’s performance, including acceleration, power, and fuel efficiency. Any significant changes in performance could indicate underlying issues that need to be addressed.
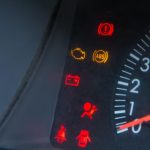
6. Pay Attention to Warning Lights: If any warning lights on the dashboard illuminate, such as the check engine light or oil pressure light, take immediate action. These lights indicate potential problems that should be diagnosed and repaired as soon as possible.
7. Perform Regular Maintenance: Follow the manufacturer’s recommended maintenance schedule for the engine to keep it in optimal condition. Regular maintenance includes oil changes, filter replacements, and inspections to ensure everything is functioning correctly.
By actively monitoring the engine’s performance and functionality, you can catch any issues early on and prevent them from escalating into more significant problems. Remember to consult with a professional mechanic if you have any concerns or questions about the new engine.
Engine Life and Head Gasket Replacement
One common problem that car owners may face after an engine replacement is the issue of engine life and the need for head gasket replacement. While a new engine can certainly improve the performance and reliability of a vehicle, it is essential to understand that the engine’s life span is not solely determined by its brand-new nature.
Over time, various factors such as maintenance, driving habits, and environmental conditions can significantly impact the engine’s longevity. Neglecting regular maintenance schedules, such as oil changes and coolant flushes, can put excessive strain on the engine and lead to premature wear and tear.
Additionally, aggressive driving styles, such as frequent high-speed acceleration, can put unnecessary stress on the engine components. This can lead to overheating and potential damage to the head gasket, which is responsible for sealing the combustion chambers and preventing coolant and oil leakage.
If the head gasket becomes compromised, it can cause a range of issues, including coolant leaks, oil contamination, and even engine misfires. These problems can manifest as overheating, white smoke from the exhaust, or loss of engine power.
When facing head gasket issues after an engine replacement, it is crucial to address the problem promptly. Ignoring the signs and continuing to drive the vehicle can result in further damage to the engine and lead to costly repairs.
Head gasket replacement involves removing the cylinder head from the engine block, replacing the gasket, and reassembling the components. This process requires a skilled mechanic and the use of specialized tools and equipment.
Regular maintenance, proper driving habits, and addressing any signs of head gasket issues promptly can help extend the overall life of an engine, even after a replacement. It is important for car owners to be proactive in caring for their vehicles and ensuring timely repairs to avoid costly and preventable damage.
Extending Engine Life After Head Gasket Replacement
Replacing a head gasket can be a costly and time-consuming process, so it’s important to take steps to extend the life of your engine after the repair is complete. By following a few simple guidelines, you can maximize the longevity and performance of your engine.
First and foremost, it’s crucial to properly maintain your engine after a head gasket replacement. This includes regular oil changes, ensuring proper coolant levels, and keeping up with recommended service intervals. Regular maintenance will help prevent further issues and ensure that your engine continues to perform optimally.
In addition to maintenance, it’s important to avoid overheating your engine. Overheating can put excessive strain on the head gasket and other engine components, leading to premature failure. To prevent overheating, make sure that your cooling system is in good working order. Check for any signs of coolant leaks and address them promptly.
Proper driving habits can also contribute to the longevity of your engine. Avoid aggressive driving and excessive revving, as this can put unnecessary stress on the head gasket and other parts of the engine. Additionally, be mindful of the load you are carrying and avoid overburdening your engine, especially when towing or carrying heavy items.
| Tip | Benefit |
|---|---|
| Use high-quality engine oil. | Provides better lubrication, reducing friction and wear. |
| Monitor coolant levels regularly. | Prevents overheating and potential head gasket failure. |
| Follow recommended maintenance intervals. | Keeps the engine in optimal condition and prevents further issues. |
| Practice smooth acceleration and deceleration. | Reduces stress on the head gasket and other engine components. |
| Avoid excessive idling. | Reduces unnecessary wear on the engine. |
By following these guidelines and taking the necessary precautions, you can help extend the life of your engine after a head gasket replacement. Remember, proper maintenance and responsible driving habits are key to keeping your engine running smoothly for years to come.
Signs of Potential Head Gasket Issues Post-Replacement
Replacing an engine can be a complex and time-consuming process, and it is important to ensure that everything is functioning properly once the replacement is complete. One potential issue that may arise after an engine replacement is a malfunctioning head gasket. The head gasket plays a crucial role in sealing the combustion chambers and preventing coolant and oil from mixing, so any issues with this component can lead to serious problems.
Here are some signs that you may be experiencing head gasket issues after an engine replacement:
- Overheating: If your engine is frequently overheating after a replacement, it may be a sign of a faulty head gasket. The head gasket helps regulate the engine temperature, and if it is leaking or damaged, it can cause the engine to run hot.
- White smoke: If you notice white smoke coming from your exhaust pipe, it could be a sign of a head gasket problem. This smoke is typically caused by coolant leaking into the combustion chambers and being burned along with the fuel.
- Loss of coolant: A head gasket leak can cause a loss of coolant, leading to low coolant levels in the radiator and overheating. If you find yourself frequently having to refill your coolant, it may be a sign of a head gasket issue.
- Milky oil: A head gasket leak can also cause coolant to mix with the engine oil, resulting in a milky appearance. If you notice this in your oil dipstick or oil filler cap, it is a strong indication of a head gasket problem.
- Engine misfire: A malfunctioning head gasket can disrupt the combustion process, leading to engine misfires. If you experience a loss of power or your engine starts to idle roughly after an engine replacement, it may be due to a head gasket issue.
If you notice any of these signs after an engine replacement, it is important to have your vehicle inspected by a qualified mechanic as soon as possible. Ignoring head gasket issues can cause further damage to the engine and result in costly repairs. A professional mechanic will be able to diagnose the problem accurately and provide the necessary repairs to resolve the head gasket issues.
Dealing with head gasket issues post-replacement can be frustrating, but addressing them promptly will help ensure the longevity and performance of your newly replaced engine.
Maintenance and Care for Long-Lasting Engines
Proper maintenance and care are essential for keeping your engine running smoothly and extending its lifespan. Here are some tips to ensure your engine lasts for a long time:
| Maintenance Task | Frequency | Description |
|---|---|---|
| Regular Oil Changes | Every 3,000 to 5,000 miles | Changing the engine oil and oil filter regularly helps remove dirt, debris, and contaminants from the engine, improving its performance and longevity. |
| Check Fluid Levels | Monthly | Regularly check and top up the engine coolant, brake fluid, power steering fluid, and transmission fluid levels to ensure optimal performance and prevent overheating. |
| Replace Air Filters | Every 12,000 to 15,000 miles | Regularly replace the engine air filter to prevent dirt and debris from entering the engine, which can cause damage and decrease fuel efficiency. |
| Inspect Belts and Hoses | Every 6 months | Check the condition and tension of the belts and hoses to ensure they are not worn, cracked, or leaking. Replace them if necessary to prevent engine damage. |
| Regular Tune-ups | Every 30,000 miles | Perform regular tune-ups, including spark plug replacement, ignition system check, and fuel system cleaning, to keep your engine running smoothly and efficiently. |
| Properly Maintain the Cooling System | Every 2 years | Flush and refill the cooling system every two years to prevent corrosion, remove contaminants, and maintain the proper temperature of the engine. |
| Drive Responsibly | Ongoing | Drive your vehicle responsibly by avoiding excessive idling, aggressive acceleration, and hard braking, as these actions can put unnecessary stress on the engine. |
| Regular Inspections | Every 6 months | Have your engine inspected regularly by a qualified mechanic to detect any potential issues early on and address them before they become major problems. |
By following these maintenance tasks and caring for your engine, you can ensure it remains in excellent condition and provides you with reliable performance for years to come.
Hyundai Engine Replacement and Denied Claims
Hyundai engine replacements can be a costly and complicated process. When faced with a faulty or damaged engine, many Hyundai owners turn to their warranty to cover the expenses. However, it’s not uncommon for Hyundai owners to encounter denied claims when seeking reimbursement for their engine replacement.
There are several reasons why a Hyundai engine replacement claim may be denied. One common reason is improper maintenance or neglect of the vehicle. If it can be proven that the engine failure was a result of poor maintenance, the claim will likely be rejected. It’s essential for Hyundai owners to follow the recommended maintenance schedule and keep detailed records as proof of maintenance.
Another reason for denied claims is the failure to follow Hyundai’s warranty guidelines. If the engine replacement was performed by a non-certified technician or aftermarket parts were used, it can lead to a denied claim. To avoid this, it’s crucial to have the engine replaced by an authorized Hyundai service center and use genuine Hyundai parts.
Additionally, an expired or voided warranty can result in a denied claim. If the vehicle’s warranty has already expired or if there has been a violation of the terms and conditions, the claim will likely be rejected. It’s important for Hyundai owners to be aware of their warranty coverage and to address any issues promptly to avoid voiding the warranty.
When faced with a denied claim, Hyundai owners have a few options. They can appeal the decision with the warranty provider and provide additional evidence to support their claim. They can also seek legal assistance if they believe their claim was wrongfully denied. It’s essential to carefully review the warranty terms and conditions and gather all necessary documentation to support the claim.
In summary, Hyundai engine replacement claims can be denied for various reasons, including improper maintenance, failure to follow warranty guidelines, and an expired or voided warranty. Hyundai owners should ensure they properly maintain their vehicles, follow warranty guidelines, and address any issues promptly to avoid denied claims. In the event of a denied claim, appealing the decision or seeking legal assistance may be options worth considering.
Navigating Hyundai Engine Replacement Denials
While engine replacements can be a costly endeavor, they are sometimes necessary to keep your Hyundai running smoothly. However, there may be times when your request for an engine replacement is denied by the manufacturer. Understanding why these denials occur and how to navigate them can help you overcome this obstacle and get the service your vehicle needs.
One common reason for a Hyundai engine replacement denial is a lack of proper maintenance records. Manufacturers often require proof that regular maintenance and servicing has been performed on the vehicle in order to qualify for warranty coverage or engine replacement. If you can’t provide the necessary documentation, it’s important to gather any available records and explain the situation to the manufacturer. Sometimes, they may make an exception based on other factors such as the vehicle’s age or mileage.
Another factor that could lead to a denial is the presence of modifications or aftermarket parts. If your Hyundai has been modified or has non-OEM parts installed, the manufacturer may refuse to cover the cost of an engine replacement. It’s important to disclose any modifications or aftermarket parts to the manufacturer and be prepared for the possibility of a denial. In some cases, they may still cover the replacement if the modifications are deemed unrelated to the engine issue.
Additionally, engine replacements may be denied if the issue is determined to be caused by driver negligence or misuse. This can include things like failure to follow recommended maintenance schedules, driving with low oil levels, or using improper fuel. If the manufacturer determines that the engine failure was a result of neglect or misuse, they may deny your request for a replacement. It is crucial to provide a detailed explanation of your maintenance practices and driving habits to demonstrate that the issue is not due to negligence.
If your request for a Hyundai engine replacement is denied, don’t lose hope. You can try escalating the issue by contacting the manufacturer’s customer service department or reaching out to a regional representative. Explain your situation calmly and provide any supporting evidence or documentation that you have. Sometimes, a different perspective or a higher authority can help overturn the denial.
When dealing with a Hyundai engine replacement denial, it’s essential to remain patient and persistent. Keep detailed records of all communication with the manufacturer and any service centers involved. If necessary, you may also want to consult with a reliable mechanic or automotive expert for further advice and guidance.
Remember, navigating engine replacement denials can be challenging, but with the right approach and determination, you can increase your chances of getting the service your vehicle needs.
Hyundai Engine Replacement Process and Costs
Replacing an engine in a Hyundai vehicle can be a complex and costly process. Here is an overview of the engine replacement process and the associated costs:
- Diagnosis: Before undergoing an engine replacement, it is important to determine the root cause of the engine failure. A thorough diagnosis will help identify the specific parts and components that need to be replaced.
- Engine Selection: Once the diagnosis is complete, the next step is to select a suitable replacement engine. Hyundai engines can be sourced from various suppliers, including Hyundai dealerships, aftermarket suppliers, and salvage yards.
- Engine Preparation: Before installation, the replacement engine needs to be thoroughly inspected and prepared. This may involve replacing gaskets, seals, and other components to ensure proper functioning and prevent future issues.
- Engine Installation: The engine replacement process involves removing the old engine from the vehicle and installing the new one. This requires precision and expertise to ensure all connections and components are properly aligned and secured.
- Testing and Verification: Once the new engine is installed, it is crucial to perform thorough testing to verify its performance and identify any potential issues. This may involve running diagnostic tests, checking for leaks, and conducting test drives.
As for the costs associated with a Hyundai engine replacement, they can vary depending on several factors, including the model and year of the vehicle, the type of engine being replaced, and the labor rates charged by the repair facility. On average, the cost of a Hyundai engine replacement can range from $2,500 to $5,000 or more.
It is important to note that these costs do not include any additional repairs or parts that may be necessary during the engine replacement process. It is recommended to consult with a reputable mechanic or Hyundai dealership to get an accurate estimate for your specific vehicle and engine replacement needs.
Hyundai Sonata, Optima, Sorento, and Soul Engine Replacement Costs
When it comes to engine replacement costs, Hyundai has a range of vehicles that are known for their reliability and performance. The Hyundai Sonata, Optima, Sorento, and Soul are popular models that can last for many years with proper maintenance. However, like any vehicle, they may eventually require an engine replacement.
The cost of replacing an engine in a Hyundai Sonata, Optima, Sorento, or Soul can vary depending on several factors, including the model year, the engine type, and the labor fees charged by the repair shop. On average, the cost can range from $2,500 to $5,000 for the engine itself, with labor costs adding an additional $500 to $1,500.
It’s important to note that these prices are just estimates and can vary based on the specific circumstances of your vehicle. Engine replacement costs can also be higher if additional repairs or replacements are needed, such as for the transmission or cooling system.
When faced with the need for an engine replacement, it’s crucial to find a trusted and experienced mechanic or repair shop. They should have a good track record of working on Hyundai vehicles and be knowledgeable about the specific engine model you have. It’s also a good idea to get multiple quotes to compare prices and ensure you’re getting a fair deal.
Additionally, before going ahead with an engine replacement, it’s worth considering the overall condition and value of your vehicle. If your Hyundai Sonata, Optima, Sorento, or Soul is nearing the end of its life or has other significant issues, it may not be financially prudent to invest in an expensive engine replacement. In such cases, it may be more cost-effective to explore other options, such as selling the vehicle or considering a used engine as a more affordable alternative.
Overall, the cost of engine replacement for Hyundai Sonata, Optima, Sorento, and Soul models can vary, but it’s important to factor in the overall condition of your vehicle and explore all available options before making a decision.
Engine Replacement Without Removing Freeze Plugs
When replacing an engine, it is common practice to remove the freeze plugs in order to facilitate the installation process. However, there are situations where removing freeze plugs may not be necessary, such as when the new engine is an exact match for the old one. This article will explain how to perform an engine replacement without removing freeze plugs.
The first step in this process is to thoroughly clean the freeze plugs. This can be done using a wire brush and a degreaser. It is important to remove any dirt, grime, or corrosion that may be present on the plugs. This will ensure a proper seal and prevent any leaks once the new engine is installed.
After cleaning the freeze plugs, it is important to inspect them for any signs of damage. Look for cracks, rust, or any other imperfections that may affect their performance. If any of the freeze plugs are damaged, it is best to replace them before proceeding with the engine replacement.
Next, carefully measure the diameter of the freeze plugs using a caliper. This measurement will be important when choosing the correct size of replacement plugs. It is crucial to select plugs that are the same size as the ones being removed. Using the wrong size plugs can result in leaks or other issues.
Once you have the correct replacement plugs, apply a thin layer of sealant around the outer edge of each plug. This will help create a tight seal and prevent any coolant from leaking out. Be careful not to apply too much sealant, as this can interfere with the fit of the plug.
With the plugs prepared, you can now begin the engine replacement process. Carefully insert each plug into its respective hole, making sure they are snug and seated properly. Use a soft-faced hammer or a block of wood to gently tap the plugs into place, if necessary.
After the new engine is installed, it is important to check for any coolant leaks. Start the engine and let it run for a few minutes, monitoring the freeze plugs closely. Look for any signs of coolant seeping out around the plugs. If you notice any leaks, it may be necessary to tighten the plugs further or reapply sealant.
In conclusion, while removing freeze plugs is often recommended during an engine replacement, there are situations where it may not be necessary. By following the steps outlined in this article, you can successfully perform an engine replacement without removing freeze plugs. Always ensure that the plugs are in good condition and properly sealed to prevent any leaks once the new engine is installed.
Replacing Freeze Plugs Without the Need to Remove the Engine
If you need to replace freeze plugs in your engine, you may be concerned about the hassle and expense of removing the entire engine. Fortunately, there is a solution that allows you to replace freeze plugs without taking the engine out of the vehicle.
The first step is to locate the freeze plugs that need replacement. These plugs are typically found on the side of the engine block and can be identified by their circular shape. Once you have identified the plugs, you will need to gather the necessary tools and supplies.
Before beginning the replacement process, it is important to drain the coolant from the engine. This can be done by removing the radiator cap and opening the drain valve at the bottom of the radiator. Once the coolant is drained, you can proceed with the freeze plug replacement.
To remove a freeze plug without removing the engine, you will need a freeze plug remover tool. This tool is designed to fit inside the plug and can be used to pry it out of the engine block. Carefully insert the tool into the freeze plug and use a wrench to turn it counterclockwise. This will loosen the plug and allow you to pull it out.
Once the old freeze plug is removed, you will need to clean the area around the hole in the engine block. This can be done using a wire brush and some solvent. Make sure to remove any debris or rust that may be present.
Before installing the new freeze plug, it is important to apply a layer of sealant to the outer edge. This will help to ensure a tight and leak-free fit. Once the sealant is applied, carefully insert the new plug into the hole and use a socket or wrench to turn it clockwise. This will tighten the plug and create a secure seal.
After all the necessary freeze plugs have been replaced, you can refill the coolant and test the engine for any leaks. If everything looks good, you can reinstall any components that were removed during the process and start the engine.
By following these steps, you can replace freeze plugs without the need to remove the engine. This can save you time, money, and hassle, allowing you to get your vehicle back on the road quickly.
Step-by-Step Guide for Freeze Plug Replacement
Having to replace a freeze plug can be a daunting task, but with the right tools and a step-by-step guide, you can get the job done. Here is a detailed walkthrough of the freeze plug replacement process:
Step 1: Gather the necessary tools and materials
Before you begin, make sure you have all the tools and materials you will need for the job. This includes a socket set, a pry bar, a new freeze plug, gasket sealant, and coolant.
Step 2: Drain the coolant
Start by draining the coolant from the engine. Locate the drain plug at the bottom of the radiator and place a catch pan underneath. Loosen the plug and allow the coolant to drain completely.
Step 3: Locate the freeze plug
Identify the freeze plug that needs to be replaced. Freeze plugs are typically located on the sides of the engine block and cylinder head. Use a flashlight if needed to get a clear view of the freeze plug.
Step 4: Remove the old freeze plug
Using a pry bar or screwdriver, carefully loosen the old freeze plug. Be cautious not to damage the surrounding area. Once it is loose, pull it out of the engine block or cylinder head.
Step 5: Clean the area
Before installing the new freeze plug, clean the area where the old plug was located. Use a wire brush or sandpaper to remove any rust or debris. This will ensure a proper fit for the new plug.
Step 6: Apply gasket sealant
Apply a thin layer of gasket sealant to the outer edge of the new freeze plug. This will help create a watertight seal once it is installed.
Step 7: Install the new freeze plug
Insert the new freeze plug into the hole where the old plug was removed. Use a socket or a press tool to gently tap the new plug into place. Make sure it is flush with the surrounding surface.
Step 8: Refill the coolant
Once the new freeze plug is securely in place, refill the coolant. Pour the coolant into the radiator until it reaches the appropriate level. Check for any leaks and ensure the coolant is properly circulating.
Step 9: Test the engine
Start the engine and let it run for a few minutes to ensure everything is working correctly. Check the coolant temperature and monitor for any signs of leakage. If everything looks good, you have successfully replaced the freeze plug!
It is important to take your time and follow these steps carefully to ensure a successful freeze plug replacement. If you are unsure or uncomfortable with any step, it is always best to consult a professional mechanic.
Benefits and Limitations of This Approach
Replacing an engine can have several benefits that make it a viable solution for common engine problems. Some of these benefits include:
- Restored Performance: A new engine can significantly improve the performance of a vehicle, providing increased power and acceleration.
- Reliability: Engine replacement can give peace of mind to vehicle owners, as a new engine is likely to be more reliable and have a longer lifespan.
- Improved Fuel Efficiency: In some cases, a new engine can lead to improved fuel efficiency, resulting in cost savings in the long run.
- Reduced Emissions: Upgrading to a newer engine can help reduce emissions, promoting a greener and more environmentally friendly vehicle.
Despite these benefits, there are also some limitations to consider before opting for an engine replacement:
- Cost: Engine replacements can be expensive, especially if specialized labor is required. It is important to weigh the cost against the value of the vehicle.
- Compatibility: It is crucial to ensure that the replacement engine is compatible with the vehicle’s make, model, and year. Otherwise, additional modifications may be necessary.
- Time and Effort: Engine replacements can be time-consuming and require skilled labor. It is essential to find a reputable mechanic or repair shop to ensure the job is done correctly.
- Warranty: The warranty on a replacement engine may be limited or non-existent, which could be a factor to consider when weighing the overall cost and potential risks.
Ultimately, the decision to replace an engine should be based on the specific circumstances of the vehicle and the owner’s priorities and budget. It is advisable to consult with a trusted mechanic or automotive professional to assess alternative solutions and determine the most suitable course of action.
Q&A:
What are some common problems that can occur after an engine replacement?
Some common problems that can occur after an engine replacement include leaks, engine misfires, electrical issues, and overheating.
How can I tell if there is a leak in the engine after a replacement?
You can tell if there is a leak in the engine after a replacement if you notice an oil or coolant puddle under the vehicle, or if you see any signs of fluid on the engine components.
What should I do if my engine starts misfiring after a replacement?
If your engine starts misfiring after a replacement, you should check the spark plugs, ignition coils, and fuel injectors for any issues. It is also a good idea to have a professional mechanic run a diagnostic test to determine the exact cause of the misfire.
Why is my replacement engine overheating?
There can be several reasons why a replacement engine may be overheating. This can include a malfunctioning thermostat, a clogged radiator, a faulty water pump, or a coolant leak. It is important to address the issue promptly to avoid causing any damage to the engine.
Is it normal to experience electrical problems after an engine replacement?
No, it is not normal to experience electrical problems after an engine replacement. If you are experiencing electrical issues, it is possible that there was a wiring mistake or a faulty connection made during the installation process. It is best to have a qualified mechanic inspect the electrical system to identify and resolve any issues.